
|
|
|||||||
| Electric Club Car Electric DS, and Precedent golf cars |
  |
|
|
Thread Tools | Display Modes |
 02-10-2016, 11:26 PM
|
#1 |
|
Not Yet Wild

Join Date: Apr 2015
Posts: 62
|
Hey everyone!
I am finishing up my restoration of my 1999 club car ds 48volt! I am looking to install a radio in it. My question is how should i wire it to get the power? I have a voltage reducer that was installed by the previous owner so i have no idea what any of the wires are exactly for. The other thing with my voltage reducer is that i already have a light kit connected to it which there again was installed by the previous owner. So how should i go about wiring this? Can i just connect the radio to two batteries? But that would be 16 volts? Should i connect it to the voltage reducer? If so what wires and how should i connect things? Should it be connected to the key switch? Thanks for the help everyone! |

|

|
 Today Today
|
|
|
__________________
This advertising will not be shown in this way to registered members. Register your free account today and become a member on Buggies Gone Wild Golf Cart Forum |
|
|
02-11-2016, 06:45 AM
|
#2 |
|
Gone Wild
Join Date: Dec 2010
Location: Orlando
Posts: 382
|
Definitely use the voltage reducer and not two single batteries. Even if you have a 36v cart I would always recommend a reducer so you are not constantly drawing from the same two batteries which WILL eventually bring there life down before the rest. There are many different kinds of reducers but most use a common ground. So most likely you have a red which goes to main +, black which goes to main -, one wire that is your 12V output and most likely another that you connect to key switch to turn reducer on and off so its not constantly hot. Using a voltmeter find the 12V output from the reducer and splice into that wire and the common negative and your in business. I would also suggest checking the reducer to see what kind of amp output it provides because I have seen some real cheap ones people have bought on ebay that put out less then 5 amps and heat up with just lights on.
|
|
|
|
|
02-11-2016, 08:19 AM
|
#3 |
|
Old Sky Soldier
 Join Date: Dec 2011
Location: Kentucky
Posts: 3,881
|
Most people put fuse blocks on when they install reducers. Look for one. Photos would help.
|
|
|
|
|
02-11-2016, 08:25 AM
|
#4 | |
|
Gone Wild

Join Date: Oct 2012
Location: Canyon Lake, TX
Posts: 628
|
Quote:
When connecting these accessories, you should wire the reducer into a terminal wiring block. This way all the accessories are cleanly wired into one location and their power source (the reducer powered by the batteries) is centralized. |
|
|
|
|
|
02-11-2016, 08:50 AM
|
#5 |
|
revolutiongolfcars.com
Join Date: Mar 2010
Location: Golf Car Capital of The World... Augusta, Georgia
Posts: 10,224
|
Keep in mind that there are two types of voltage reducers. There is one that reduces 16 volts from 2 batteries down to 12 volts and there is another type that reduces 48 volts of the entire battery pack down to 12 volts. For a stereo install, you definitely need the 48 to 12 reducer. Car stereos have a permanent draw on the system because of the yellow memory wire and you want to have a balanced draw on the battery pack or you'll eventually end up with battery problems.
|
|
|
|
|
02-11-2016, 09:07 AM
|
#6 | |
|
Not Yet Wild
Join Date: Apr 2015
Posts: 62
|
Quote:
 |
|
|
|
|
|
02-11-2016, 10:30 AM
|
#7 |
|
Crazy Wild
Join Date: Jun 2015
Location: Carolina Lowcountry
Posts: 796
|
If you don't have a fuse block coming off the convertor, you need to install one. All accessories should run thru fuse block.
Without fused circuits, if you have a short, at best you'll have minor damage at worse you'll burn up your buggie. |
|
|
|
|
02-11-2016, 11:17 AM
|
#8 |
|
Getting Wild
Join Date: Nov 2015
Location: Dayton, Ohio
Posts: 134
|
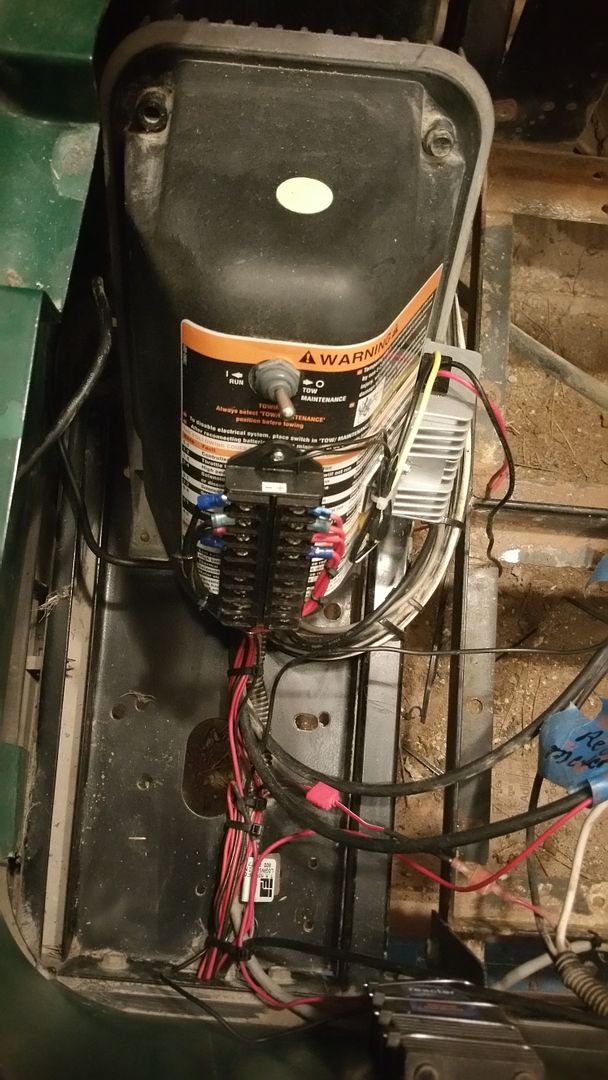
Here's how I installed mine.
 |
|
|
|
|
02-11-2016, 11:30 AM
|
#9 |
|
Gone Wild
Join Date: Dec 2010
Location: Orlando
Posts: 382
|
FYI if you have decent reducer it will have an inline fuse in it already. If the guy who owned the cart before you wanted to do everything at lowest cost then you have to worry and may need a higher amp output reducer but definitely go 48-12V.
|
|
|
|
|
02-11-2016, 11:27 PM
|
#10 | |
|
Not Yet Wild
Join Date: Apr 2015
Posts: 62
|
Quote:
|
|
|
|
|
|
|
||||||
|
|
 Similar Threads
|
||||
| Thread | Forum | |||
| RXV stereo install | Electric EZGO | |||
| Stereo Install in a 05 EZ GO | Electric EZGO | |||
| help with Keyswitch wiring for stereo install | Gas EZGO | |||
| Stereo Install | Electric EZGO | |||
| Stereo Install | Electric EZGO | |||


 Linear Mode
