
|
|
|||||||
| Electric Club Car Electric DS, and Precedent golf cars |
  |
|
|
Thread Tools | Display Modes |
 10-30-2011, 11:45 PM
|
#1 |
|
Getting Wild

Join Date: Feb 2009
Location: Sydney NSW
Posts: 92
|
Buggiesgonewild
2 years ago l contemplated changing my 05 Precedent to 6x8v but chickened out.....one of the 4 replacements I put in then, dropped a cell this week so I was up for batteries again! I mentioned that if I did the conversion I would post the project. So here we go. The tools I used............. *Small angle grinder Hammer Chisel French chalk Hacksaw blade 6 or 8" piece of 2x4 Electrical tape Pliers 6" flat screwdriver Battery lifting strap Paper templates The modification is quite straight forward, but not for the faint hearted. No extraneous damage was incurred...but there is plenty of opportunity to do so. No stickers or decals were damaged or removed. I put the 2 back batteries on the floor within the tub and the front battery protrudes out of the tub into the void between the tub and body. Cost is minimal.... What I did..... 1) Put switch to TOW 2) Disconnected neg. terminal first then all the rest and removed the batteries. 3) Taped up the positive lead to prevent accidental discharge of the capacitor. 4) Cut out 3 paper templates the size of the 8v batteries. The work begins! *Using a 4" angle grinder I cut off the battery location lugs down on the floor to *level. I used a lump of 2x4 to check they were low enough. Next was the rib at the back of the tub it protrudes into the floor area ...removing the bottom part creates a 3"x4" hole....(collateral damage). There is also a small horizontal lip where the wall meets the floor that has to go, this continues around the corner, I used the templates to determine how far to remove, the angle grinder cannot get all of this out of the corners and a 1/2" woodworking chisel worked a treat on the plastic....the back outside corners also need to be relieved creating another 1"Wx4"H hole in the tub from the floor up, use the template to mark the corner....BE CAREFUL there is a cable down low near the corner....LOOK before you cut. See pictures. The front battery is a more delicate affair. I cut the passenger side first....I started about an inch from the center cover, 1/4" on top of the *rib....BE VERY CAREFUL with the cutting depth in this area, the wiring loom is behind here....it was located low on mine...see the pictures....the loom also needs to be 'let in' to the moulded form that is part of the cowl backing. I used a new hacksaw blade for this.* The floor area for the front battery cannot be as low as the 2 rear batteries....there is a tub mounting bolt that should remain....however I did grind the head down a dash....there is a small area where the front part of the front battery sits that I filled with the flat cut out sections of the tub....fiddly but I believed necessary. The back half of the front battery needs some packing to bring it up to the height of that mounting bolt....I used an old mudflap....about 3/16" thick. Repeat all of the above on the drivers side...being careful with cutting depth...there *are more wires on this side too....down low. I laid in the templates to make sure there was enough room....without lifting the batteries in and out. I only put the batteries in ONCE. On the Precedent the 3 battery cables are all the same length....I cut 2 of *these in half and fitted them with new lugs (my only cost). The battery hold down bolts need modifying....the hook on the bottom needs to be 'twisted' 90* so the kink in the rod can fit between the batteries and engage the bracket under the cart. I found that the kink needed to be toward the front of the cart to wiggle up between the batteries. RHS is the opposite to the LHS....think and plan before you bend/twist....good USofA steel....but I would not want to do it twice! I simply retained the kink part in the vice and used a 15" adjustable wrench to turn the 'hook' through 90*. So far I have only retained the batteries with a timber keeper...the Club Car part # 103374801 Battery hold down bracket may be able to adapt...at this stage I have not pursued this avenue. My project probably took me a full day...I DO procrastinate and hate making mistakes....or doing something twice...especially when it can be done right the first time. I am very happy with my job. I hope this helps anyone with either doubts or indecision. It CAN be done....easily. Passengers side 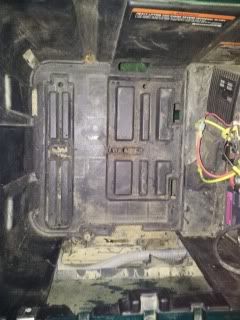 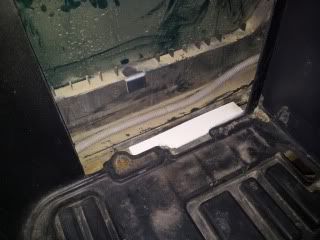 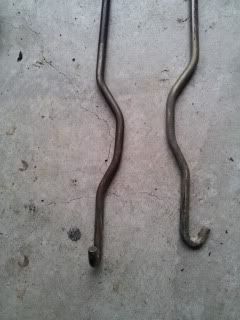 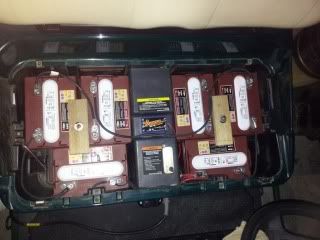 |

|

|
 Today Today
|
|
|
__________________
This advertising will not be shown in this way to registered members. Register your free account today and become a member on Buggies Gone Wild Golf Cart Forum |
|
|
10-31-2011, 10:58 AM
|
#2 |
|
Gone Wild
Join Date: Jun 2010
Location: East Texas
Posts: 602
|
Looks good driver! I can't believe you got them to fit. Are you going to change your OBC?
|
|
|
|
|
10-31-2011, 02:35 PM
|
#3 |
|
Getting Wild
Join Date: Feb 2009
Location: Sydney NSW
Posts: 92
|
G'day, not at this stage...l am still trying to find out more about CCs criteria to bring out the different versions of the OBC.
I've read that 48v is 48v and that the 6x8v pack has the same amount of cells as the 4x12v....l have also read that the latest ver. has a better algorithm, so l know it would be a better scenario....so would a 500amp Altrax  ...but my cart and charger are 6 years old, so l am comfortable with the original OBC. I know if the OBC fails l will be replacing it with whatever CC recommends. ...but my cart and charger are 6 years old, so l am comfortable with the original OBC. I know if the OBC fails l will be replacing it with whatever CC recommends. A bit more research of the 2008 Precedent (where CC changed back to 6x8v), parts list shows that on page 197 it lists 4x12v Ventmaster batteries uses Version 3.0 as the OBC....and page 211 lists OBC ver. 4.0 fits both 4x12v and 6x8v batteries on the new battery tray/configuration. I believe CC are up to ver. 6 now?.....so there is obviously improvements to be benefited from.  I'd like to find a list actually showing what ver.3 replaced throughout the CC range...maybe l need to do some more research? |
|
|
|
|
02-14-2012, 10:57 PM
|
#4 |
|
Getting Wild
Join Date: Feb 2009
Location: Sydney NSW
Posts: 92
|
I have been meaning to post an up date for awhile after my conversion and have not got around to it.....
I followed the 'break in ' process to the letter and experienced the marked difference of the extra kick that comes with it....absolutely amazing! The other big thing is I now get THREE rounds of golf out of one charge...the pack drops to 65% after rest after the third round. Before the conversion, the light was coming on with 2 year old 4x12v.....so now the benefit is quite handsome....the charger still only runs for about 6 to 7 hours once a week rather than three! Water usage is also minimal. I have not changed the OBC....and the cart is a completely different cart to drive, before the conversion you didn't know what speed mode you were in, now it is always in the fast mode, no variation in performance. I am more than happy with the cart now....back to the way it should have been! (in my opinion) 6x8v! My only down side is the cart trailer now scraps on my driveway because of the extra weight.....minimal discomfort! |
|
|
|
|
02-15-2012, 12:29 AM
|
#5 |
|
Member 23082
 Join Date: Mar 2010
Location: Spokane Washington
Posts: 1,169
|
Nice Work
OT |
|
|
|
|
02-15-2012, 07:59 AM
|
#6 |
|
Gone Wild
Join Date: Dec 2011
Location: West Tx
Posts: 282
|
Nice job there mate! Bet you are gonna love that.
|
|
|
|
|
02-15-2012, 08:21 AM
|
#7 |
|
The Last Moja Morani
Join Date: Jan 2007
Location: jumping from cart to cart
Posts: 8,975
|
perfect example why its better to go with the 6 volt batteries rather than 12 volt..................thanks for sharing this as it may help a few people on the fence decide.................................
|
|
|
|
|
02-15-2012, 03:14 PM
|
#8 |
|
The Last Moja Morani
Join Date: Jan 2007
Location: jumping from cart to cart
Posts: 8,975
|
to late to edit but i meant 8 volt batteries not 6 volt......just another brain fart ....................................
|
|
|
|
|
04-15-2012, 10:11 AM
|
#9 |
|
Not Yet Wild
Join Date: Apr 2012
Posts: 7
|
Can you use the same charger you had for the 12v system to charge the 8v system? Did you wire it the same series just adding two extra batteries? Thanks
|
|
|
|
|
04-16-2012, 05:25 AM
|
#10 |
|
Getting Wild
Join Date: Feb 2009
Location: Sydney NSW
Posts: 92
|
G'day zimms, Yes my whole set up is stock standard....charger and OBC....yes the batteries are in standard series wiring format, using the original battery cables cut in half. The extra cable lugs were my only real cost on the modification. I love the cart the way it is now....maybe just a little bit lower to look at, and I do notice the difference in weight when I man handled it (I'm 64).
The cart is totally reliable in performance now, no more crawling away on one acceleration and then like a hare on the next....it goes like a hare ALL the time....just the way it SHOULD be! The only thing l'm doing different since my last post is l have decided to charge after every use because of our electricity cost increases here in Australia....so it gets 3 top-ups (1.5-2hrs) 3 times a week at 10.01pm @ 9c/kwh....instead of 40c/kwh once a week(6-8hrs) after golf. Hope this helps you make up your mind. I decided I was not going to trade up or change the cart...it was my first and will be my last...chopping the guts out to fit the 8v batteries was the hardest decision...once I did I had NO regrets whatsoever! It is MY cart and it's performance (stock) now matches my expectations. Wouldn't have it any other way! |
|
|
|
|
|
||||||
|
|
 Similar Threads
|
||||
| Thread | Forum | |||
| Precedent 6X8 Conversion? | Electric Club Car | |||
| Precedent conversion -another option | Electric Club Car | |||
| Use It For Free Or Own It | Garage and Workshop | |||
| free | Gas EZGO | |||


 Linear Mode
