
|
|
|||||||
| Electric Club Car Electric DS, and Precedent golf cars |
  |
|
|
Thread Tools | Display Modes |
 02-18-2012, 06:34 AM
|
#1 |
|
Gone Wild

Join Date: Dec 2011
Location: West Tx
Posts: 282
|
Finally made some time to get this done and it is GREAT. Had previously been riding around with my DMM, trying to watch it, untanlge it, and keep the dog out of it.
These things are really nice and SO easy to install. After doing it, I wouldn't even consider going without the trim plate. Nice touch Scotty... Wired mine with the "ignition on" option. I LOVE IT!  I thought some of you might like seeing where we ride. Just some trails in a pasture about a half mile from the house..... Where We'd been...  Ready To Roam....no time for a pose.... 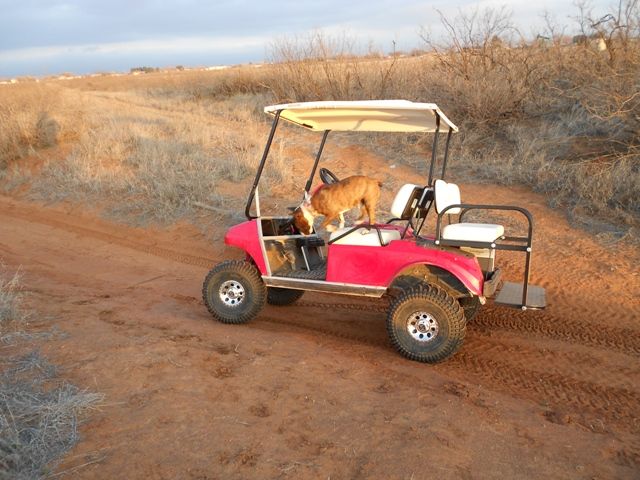 Headed Home...Camera was focused ahead. The digital display is actually razor sharp.  |

|

|
 Today Today
|
|
|
__________________
This advertising will not be shown in this way to registered members. Register your free account today and become a member on Buggies Gone Wild Golf Cart Forum |
|
|
02-18-2012, 06:56 AM
|
#2 |
|
Medicare Recipient

 Join Date: Jun 2011
Location: West Michigan
Posts: 3,541
|
|
|
|
|
|
02-20-2012, 12:45 PM
|
#3 |
|
Not Yet Wild
Join Date: Sep 2011
Location: East Texas
Posts: 70
|
I have the same year and 36v cart as you. Can you give a newbie detailed instructions on how you installed this? Any other advise on what you have done to your cart would be a big help as I am going to start trying to restore mine to make it more reliable. Thanks.
|
|
|
|
|
02-20-2012, 02:02 PM
|
#4 |
|
Gone Wild
Join Date: May 2011
Location: Charleston, South Carolina
Posts: 672
|
It looks like he's trying to get to the pedal to make the cart go again...
-Scott H. |
|
|
|
|
02-20-2012, 03:59 PM
|
#5 |
|
Happy Carting
Join Date: Dec 2007
Location: Southern California
Posts: 73,406
|
That looks good. You did a nice install.
Now there's no reason to worry about staying out too long or to be going home too early... Just remember 36.3 is empty and 38.2 is full. And follow the usage in 10ths of a volt...That gives you nearly 20 steps or readings from empty to full. Beats the heck out of the old 4 bar led meter where 1 bar down was okay and the second bar down was Thanks for posting the pics, The Cart looks capable... & it looks like you have a nice place to run the dog there too. |
|
|
|
|
02-20-2012, 05:02 PM
|
#6 |
|
Gone Wild
Join Date: Nov 2010
Location: Auburndale,fl
Posts: 256
|
Looks good ,,,i like mine to no guessing..
|
|
|
|
|
02-20-2012, 06:51 PM
|
#7 | |
|
Not Yet Wild
Join Date: Nov 2011
Location: S. Georgia
Posts: 42
|
Quote:
|
|
|
|
|
|
02-21-2012, 08:29 AM
|
#8 | ||
|
Gone Wild
Join Date: Dec 2011
Location: West Tx
Posts: 282
|
Quote:
Quote:
|
||
|
|
|
|
02-21-2012, 08:32 AM
|
#9 | |
|
Gone Wild
Join Date: Dec 2011
Location: West Tx
Posts: 282
|
Quote:
I will give all details later, but off to work now. I'll have that here by the time you get a meter. If you order one, do not forget the trim plate. I prefer the rectangle one, but there is oval too. Sorry I can't answer all now. Stay tuned... |
|
|
|
|
|
02-22-2012, 08:05 AM
|
#10 | |
|
Gone Wild
Join Date: Dec 2011
Location: West Tx
Posts: 282
|
Quote:
 However...If I can do this anyone can. After getting into this cart, I am finally conquering my ignorance of eletrical stuff. One baby step at a time. Skip step one if you are ahead of me on electrical stuff. I wanted mine on with ignition on only, but it is personal preference. You asked for details on doing it, so here you go. My apologies if this is too long and drawn out. Lastly, this is how I did it and what worked on my cart. There...Thats' my disclaimer. 1. Get a digital multimeter if you dont have one, start using it on your cart to get familiar with it and volts at different points on your cart. 2. Run a wire from NEGATIVE on the last battery (#6) in the pack to the front of the cart. Drivers's side front Batt. I used 16Ga primary wire you can get in any auto parts store. Run it out along the wires going to the front ignition panel, and long enough to reach. While you are doing this, check all the wires. I secured mined down tight because I'm in the brush a lot. Don't tighten them down yet, you may need slack, so do it later. 3. Remove the screws on the side of the igniton panel. With care, push down, and pop the panel loose from the top. You may have to pry it from the top with a large flat screw driver or trim tool. There is a small lip here securing it under aluminum trim. Once loose, you can pull the whole thing back, just be careful of the ignition and buzzer wire connections. Now you can see which ignition switch post you want for POSITIVE to your DVM with key on only install. Attach your Neg meter lead to Negative on #6, or your lead wire if you ran it already. I used Alligator clip leads to do this. Turn the key to on, and touch each post to get your pack charge to show on your meter. In my case it was the blue wire with the key in ON position. Again, this will be your wire for positive to the DVM. If you connect it to the other post on the ignition, your DVM will be on all the time. Up to you.... 4. Next you have two options. You can put the dash panel back in the forward position without snapping it in to cut your slot. Or, you can take the panel completely out with a little care and effort. You'll notice it is split below the steering column for this. I did it this way and put it on my bench to work on it there. Much easier to me this way, but up to you. Do note that there are retainer clips for each of the panel screws. Keep an eye out for these when you pull the panel off...don't lose em cause they anchor your screws. Draw a diagram or take a picture to remember where the wires all go. In either case, decide where you want your meter, put the trim plate there and trace the inside of it with a sharpie or something. Now you have the layout lines for the meter. I used a Dremel with a grinder disk to cut the slot out. Cut ON the lines and be careful to be precise. Try fitting your DVM in the slot. I finished mine to fit by filing it the rest of the way out. 5. Once your DVM fits snug in the hole you cut, put it in the trim plate, then the slot. Now you are ready to install the brass retainer that came with your meter. Slip it onto the back of the meter with the "teeth" pointing to the front of the cart. With some effort, you will get it all the way down to the inside back of the panel. Keep pressing it until your meter is secure. I found pressing with my thumbs on the bottom of the "teeth" worked best. Don't press on the long curves, or you'll bend the retainer. Put the panel partially back on, hook up your wires. Re-install the panel...you're done. As for other stuff I've done... First, I removed all the batteries (drawings of wiring first), cleaned the frame with scraping, wire brush and baking soda solution. Cleaned the batts and cables....replaced a few as well. Cleaned all major connections, some needed new connector ends so replaced those. I use PJ1 air filter oil on my battery connections and battery trays for protection. Installed a flip seat. I helped put on the lift kit and heavy rear springs when I bought the cart. We didn't have new rear bushings or sleeves at the time, so I put those on later. Painted the wheels black and put on covers. In a month or so, I plan on putting all new controls in to get rid of the resistor set up, and be ready for a 48V conversion. A little leary about doing this, but want to tackle it. Thats about it I think.... Oh yea...with some help from Scotty B, I put full power to my reverse and LOVE it. This is so easy and its FREE! If you have questions, feel free to PM me, or we can talk on the phone. I'll be glad to help. |
|
|
|
|
|
|
||||||
| Thread Tools | |
| Display Modes | |
|
|
 Similar Threads
|
||||
| Thread | Forum | |||
| FS 22x11-10 x trails | Golf Carts and Parts | |||
| Wisconsins Tri County Trails | Events and Places to ride | |||
| looking for trails | Electric EZGO | |||
| Hatfield and McCoy Trails | Events and Places to ride | |||


 Linear Mode
