
|
|
|||||||
| Gas EZGO Gas EZGO Marathon, Medalist, TXT and RXV. |
  |
|
|
Thread Tools | Display Modes |
 12-15-2010, 07:34 PM
|
#1 |
|
Not Yet Wild
Join Date: Dec 2010
Posts: 6
|
I would like input on what tools or gadgets you or someone you know has used to do this work. I have my driven clutch remove and I will be replacing the clutch cam 36 degree with a 28 degree cam. Need a little info on how you hold and load the spring. I have a press I can use if I need one. Thanks!!!!!! for the
 |

|

|
 Today Today
|
|
|
__________________
This advertising will not be shown in this way to registered members. Register your free account today and become a member on Buggies Gone Wild Golf Cart Forum |
|
|
12-15-2010, 08:58 PM
|
#2 |
|
Doin' the Wild Thang

Join Date: Mar 2010
Location: Greenville, AL
Posts: 1,063
|
I wish I could tell ya an easy way to do it, but I havent found one yet. I did find that if you can find a buddy to help ya it's so much easier. One person can rotate the sheaves to the required tension and hold it while the other lines the cam up. Light pressure in a vise at this point would assist in holding it all together while you put the snap ring back on.
|
|
|
|
|
12-15-2010, 10:36 PM
|
#3 |
|
Not Yet Wild
Join Date: Dec 2010
Location: Minneapolis, Kansas
Posts: 66
|
Did you go with the stock spring? Does the spring come to points on each end?
|
|
|
|
|
12-15-2010, 10:45 PM
|
#4 |
|
Gone Wild
Join Date: Oct 2010
Posts: 6,730
|
I put two 4" C-clamps to hold the two sheaves together and to assist in keeping them from rotating. I used a sharpie to mark the sheave and the helix as to where they needed to line up. I couldn't rotate the helix far enough by hand to make it line up. I used a large pipe wrench for added leverage and that did the trick. Once the helix was on the splines, it was easy to hold it there until I got the snap ring back on.
|
|
|
|
|
12-16-2010, 12:03 PM
|
#5 |
|
Gone Wild

 Join Date: Jul 2008
Location: Reddick IL
Posts: 11,220
|
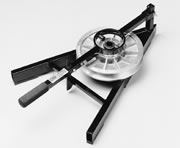
I use this on sled clutches
 |
|
|
|
|
12-16-2010, 04:46 PM
|
#6 |
|
Not Yet Wild
Join Date: Dec 2010
Posts: 14
|
I replaced 2 driven clutch springs at the weekend in my 2 ST350s
First things first, when replacing your cam, make sure you have 3 new ramp buttons. they are very cheap, and there is no point in ruining your new 28deg cam with worn out ones. Secondly, how to do it: Use a plastic tie through the hole in the centre of the clutch, and tie it around the outside of the clutch to stop the cam from being forced off by the spring when the surclip is removed. Secondly, push down on the cam to relieve the pressure on the clip and remove. Now the tie should take the strain of the spring pushing the cam out. Now you can remove this tie while holding the cam, and gently let it spring out (be careful, the cam can be forced off quite hard by the spring) Replace the 3 plastic ramp buttons in the bottom of the clutch, and clean up any dust from worn buttons replace the spring with the new pronged version for the new cam, install one end into the no2 hole in the clutch. place the cam over the spring and locate the prong in the cam use a clamp or 2 (or get a friend to help) hold the 2 halves of the clutch pully stationary, and turn the cam 1/3 of a turn, so the teeth (ramps) go into the next set of corresponding ramps in the pully ie so the spring is tensioned, dont let the 2 halves of the clutch turn against each other or the spring wont tension. Pust the cam down to locate onto the splines, and now rotate (gently) the 2 sections of the clutch against each other to allow the ramps to locate - you will know when they have as the cam will go down further and allow you to put the surclip back on. thats it. its easy enough, if a little fiddly. may need a friend to help as it does need more than 2 hands. you will really notice the difference, my vehicles already had this cam and spring - but needed the ramp buttons replaced. Now the clutch springs are tensioned correctly, and the ramp buttons renewed they have so much more torque and pull way better enjoy the benefit! |
|
|
|
|
12-17-2010, 08:55 AM
|
#7 | |
|
Not Yet Wild
Join Date: Dec 2010
Posts: 6
|
Quote:
Yes used the stock spring and it has the points at the ends. |
|
|
|
|
|
12-17-2010, 09:31 AM
|
#8 |
|
Getting Wild
Join Date: Jul 2009
Location: Ludington MI
Posts: 123
|
|
|
|
|
|
12-17-2010, 10:25 AM
|
#9 |
|
Not Yet Wild
Join Date: Dec 2010
Posts: 6
|
Thanks!!!!!!! Guys got the clucth repaired last night! Oooooooowwwwweeeeee
Have all the power I need now!!!!!!! |
|
|
|
|
12-18-2010, 03:59 PM
|
#10 |
|
Getting Wild
Join Date: Sep 2010
Location: Sanford, North Carolina
Posts: 88
|
Hey guys I was thinking of switching to a shorter belt to help my low end torque. I have a 1995 medalist with 22inch tiries and need some help climbing hills. Will the 28 dgree cam and spring work better? If so where do you get the 28 degree clutch. I found the spring on some of the sponser sites but couldn't find the cam.
|
|
|
|
|
|
||||||
|
|
 Similar Threads
|
||||
| Thread | Forum | |||
| Driven Clutch spring | Gas EZGO | |||
| 87 driven clutch spring | Gas EZGO | |||
| G1 Driven Clutch spring | Gas Yamaha | |||
| need driven clutch power spring | Golf Carts and Parts | |||
| Replacing clutch and spring on '89 G2 | Gas Yamaha | |||


 Linear Mode
