
|
|
|||||||
| Electric EZGO Electric EZ GO Marathon, Medalist, TXT and RXV. |
  |
|
|
Thread Tools | Display Modes |
 08-31-2013, 02:59 PM
|
#11 | |
|
Getting Wild

Join Date: Jul 2012
Location: SW Florida
Posts: 89
|
Quote:
|
|

|

|
 Today Today
|
|
|
__________________
This advertising will not be shown in this way to registered members. Register your free account today and become a member on Buggies Gone Wild Golf Cart Forum |
|
|
08-31-2013, 05:05 PM
|
#12 |
|
Getting Wild
Join Date: Jul 2012
Location: SW Florida
Posts: 89
|
Busted out the box of model paints:
 If you apply the paint fairly thick and work quickly you should have almost no brush strokes visible. |
|
|
|
|
09-01-2013, 12:45 AM
|
#13 |
|
Getting Wild

Join Date: Jun 2013
Location: La Vernia, TX
Posts: 122
|
Impressive Bro!!! My 82 3-wheeler next ok?!
|
|
|
|
|
09-01-2013, 12:59 AM
|
#14 | |
|
Getting Wild
Join Date: Jul 2012
Location: SW Florida
Posts: 89
|
Quote:
|
|
|
|
|
|
09-01-2013, 09:07 AM
|
#15 | |
|
Gone Wild
 Join Date: Oct 2010
Location: Lancaster SC
Posts: 827
|
Quote:
|
|
|
|
|
|
09-02-2013, 01:45 PM
|
#16 |
|
Getting Wild
Join Date: Jul 2012
Location: SW Florida
Posts: 89
|
Thanks!
Last night I did more paining with the model paints, sometimes it pays to hang on to stuff. A couple quick coats of metallic silver and then a couple coats on the lettering with the enamel paints:  |
|
|
|
|
09-02-2013, 01:55 PM
|
#17 |
|
Getting Wild
Join Date: Jul 2012
Location: SW Florida
Posts: 89
|
I'm finally starting on the electronics today, need to get as much done as possible before I go back to work tomorrow. I used JB Weld to affix 2 corner brackets to the top inside the dash cavity, then cut some .50 home depot scrap plywood to fit how I liked. I also decided I'm going to put my voltage reducer and fuse block to the left of the radio so I cut another piece to fit that spot:
  Nothing too exciting but progress is progress. Took a lot of dry fitting but the radio fits TIGHT, just what I wanted. |
|
|
|
|
09-02-2013, 01:55 PM
|
#18 |
|
Getting Wild
Join Date: Jul 2012
Location: SW Florida
Posts: 89
|
Oops double post...
|
|
|
|
|
09-05-2013, 06:05 PM
|
#19 |
|
Getting Wild
Join Date: Jul 2012
Location: SW Florida
Posts: 89
|
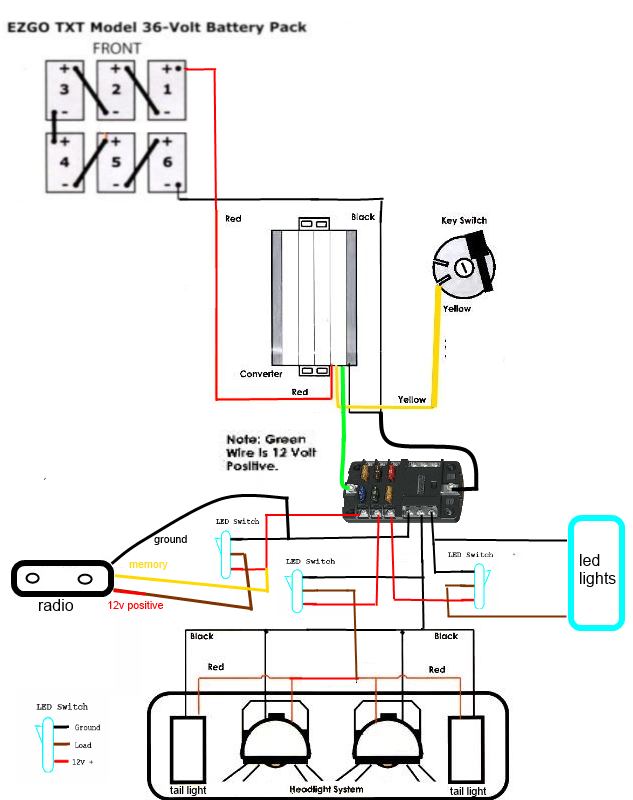
Spent a couple hours on wiring, followed crash test dummies' diagram to a T (Thanks again!):
 No go, I will have to troubleshoot tonight and see if I made a stupid mistake or if the 30 amp reducer is bad. |
|
|
|
|
09-05-2013, 06:27 PM
|
#20 |
|
Gone Mad
Join Date: Oct 2009
Location: Buford, GA
Posts: 8,988
|
Your wire colors match mine. Make sure you have 36 (or 48 volts) + on both the yellow and red when the key switch is on.
Only thing I'd add is a fuse on your red wire. |
|
|
|
|
|
||||||
|
|
 Similar Threads
|
||||
| Thread | Forum | |||
| Why "Carbon Fiber" "Wood grain" and Diamond Plated? | Gas EZGO | |||
| Speed upgrade: The biggest bang for my buck? | Electric EZGO | |||
| Biggest Bang for Buck | Electric EZGO | |||
| best bang for the buck | Gas Yamaha | |||
| Best bang for your buck in engine performance | Gas Yamaha | |||


 Linear Mode
