
|
|
|||||||
| Electric EZGO Electric EZ GO Marathon, Medalist, TXT and RXV. |
  |
|
|
Thread Tools | Display Modes |
 02-07-2011, 10:56 AM
|
#1 |
|
Not Yet Wild
Join Date: Jan 2011
Posts: 18
|
Hi All,
I have a radio that i want to wire up, being EXTEMELY GREEN with this sort of thing i am turning to the experts, attached is a pic of the deck, we have a yellow wire, i believe is POWER says to connect to constant 12v supply terminal (12v) a black wire, is GROUND a red wire, says to connect to terminal controlled by ignition switch (12v) a blue/white wire,i is remote antenna?? the manual says connect to system control terminal of the power amp or auto-antenna relay control terminal(max 300mA 12Vdc) but it said something about the remote control. two purples, lt frt SPEAKER? two greens, rt frt SPEAKER? two whites, lt rear SPEAKER? two grey, Rt rear SPEAKER? MY Plan is to ground the black to the frame, (sand the paint off, bolt it in and spray primer over it) the yellow i was thinking of bolting it to the last battery (12v) positive? or connect to my acc switch?.. the red goes where?. the instructions say the following; when installing this unit in a vehicle without an ACC(accessory)position on the ignition switch, failure to connect the RED cable to the terminal that detects operation of the ignition key may result in battery drain.. I purchased a (12v)ACC on off swith with a light to indicate power (see pic), it has 3 points of contact, i assume positive, negative and the third is for a positive/negative hook up? which this would go to the batterys?.. the blue/white what should i do? the speaker cables since i have four and i am only installing two speakers for now ill connect two directly to speakers and the other two tie them off for future use.. is this good?.. or am i completly off? lol.... |

|

|
 Today Today
|
|
|
__________________
This advertising will not be shown in this way to registered members. Register your free account today and become a member on Buggies Gone Wild Golf Cart Forum |
|
|
02-07-2011, 11:47 AM
|
#2 |
|
Gone Wild
Join Date: Mar 2009
Location: Roseville, CA
Posts: 2,757
|
If you have a 36v cart you can use 2 of your 6v batteries in series to get your 12v power for the stereo. Here's the answers to your questions:
we have a yellow wire, i believe is POWER says to connect to constant 12v supply terminal (12v) Connect to + on your 12v supply. a black wire, is GROUND Connect to - on your 12v supply. a red wire, says to connect to terminal controlled by ignition switch (12v) Connect to your accessory switch you bought. a blue/white wire,i is remote antenna?? the manual says connect to system control terminal of the power amp or auto-antenna relay control terminal(max 300mA 12Vdc) but it said something about the remote control. Not used unless you have an amp you're trying to power. Leave it tied off. two purples, lt frt SPEAKER? Connect to left front speaker. two greens, rt frt SPEAKER? Connect to right front speaker. two whites, lt rear SPEAKER? Leave disconnected. two grey, Rt rear SPEAKER? Leave disconnected. MY Plan is to ground the black to the frame, (sand the paint off, bolt it in and spray primer over it) NOTE: Nothing on an electric cart gets grounded to the frame. Any grounds you need get wired back to the - connection on your 12v supply. the yellow i was thinking of bolting it to the last battery (12v) positive? or connect to my acc switch?.. Goes directly to the + on the 12v supply. the red goes where?. Connect to the accessory switch. the instructions say the following; when installing this unit in a vehicle without an ACC(accessory)position on the ignition switch, failure to connect the RED cable to the terminal that detects operation of the ignition key may result in battery drain.. I purchased a (12v)ACC on off swith with a light to indicate power (see pic), it has 3 points of contact, i assume positive, negative and the third is for a positive/negative hook up? which this would go to the batterys?.. 1 connection to the red wire from the stereo, 1 wire to the + on the 12v supply. You will not have an indicator light unless you attach a wire from the - on the 12v supply to this point. the blue/white what should i do? Leave it alone and disconnected. the speaker cables since i have four and i am only installing two speakers for now ill connect two directly to speakers and the other two tie them off for future use.. Correct. Here is a visual of a 12v supply from the 36v battery pack: 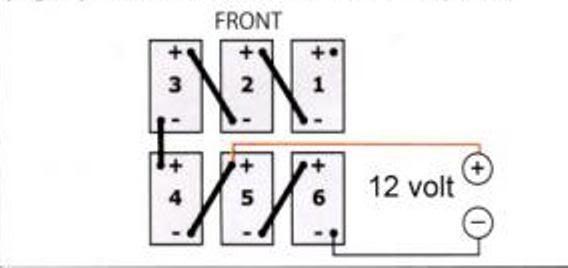 |
|
|
|
|
02-07-2011, 01:41 PM
|
#3 |
|
Not Yet Wild
Join Date: Jan 2011
Posts: 18
|
WOW
THANK YOU SO MUCH!!!!!  VERY HELPFUL |
|
|
|
|
02-07-2011, 02:28 PM
|
#4 |
|
Gone Wild

Join Date: Jan 2011
Location: Murray KY
Posts: 219
|
Double post.
Last edited by Gale Hawkins; 02-07-2011 at 02:31 PM.. Reason: double post |
|
|
|
|
02-07-2011, 02:30 PM
|
#5 |
|
Gone Wild
Join Date: Jan 2011
Location: Murray KY
Posts: 219
|
Doug is great.
Doug if you created that last diagram could you draw pulling 12v off the other two sets of batteries also and tying them together at a common point like I need to do to run the 2000/4000 watt 12v-120v inverter off of the 36v golf cart? |
|
|
|
|
02-07-2011, 03:25 PM
|
#6 | |
|
Gone Wild
Join Date: Mar 2009
Location: Roseville, CA
Posts: 2,757
|
Quote:
What are you planning to operate with an inverter? IMO, a large inverter should not be run from the cart bank, you need separate batteries. Not to say it won't work but a 2000 watt inverter will kill 2x6v batteries in 30 minutes running something like a 1200w coffeemaker. Recharging after using the inverter would overcharge the other 4 batteries in the pack so bad it would probably ruin them. |
|
|
|
|
|
02-10-2011, 09:11 PM
|
#7 |
|
Not Yet Wild
Join Date: Feb 2011
Posts: 2
|
Would it be a good idea to run a switch on the radio? I know the memory would get cleared every time you flip the switch, but what about eliminating the (very small) load on the batteries when the cart is stored?
|
|
|
|
|
|
||||||
|
|
 Similar Threads
|
||||
| Thread | Forum | |||
| EZGO Gas Radio Install - Ovehead | Gas EZGO | |||
| overhead radio install? | Electric EZGO | |||
| Install radio 2006 ez go | Electric EZGO | |||
| Radio install | Design Center | |||
| Lights and a Radio install.... | Electric Club Car | |||


 Linear Mode
